


Grubby grout can transform an otherwise pristine bathroom or kitchen into a space that appears neglected and dated. Yet restoring that fresh, clean appearance need not involve expensive commercial cleaners or harsh chemicals. A simple combination of three household ingredients promises to rejuvenate discoloured grout in just 15 minutes, delivering results that rival professional cleaning services. This straightforward method has gained considerable attention for its effectiveness and accessibility, offering homeowners an affordable solution to a common domestic challenge.
The revolutionary method for sparkling tiles
The simplicity of this cleaning approach lies in its reliance on ingredients already present in most homes. Rather than purchasing specialist products laden with synthetic compounds, this method harnesses the natural cleaning power of everyday substances. The technique addresses the porous nature of grout, which readily absorbs dirt, moisture and bacteria, leading to the unsightly discolouration that plagues tiled surfaces over time.
Understanding grout deterioration
Grout deteriorates for several identifiable reasons. Its porous composition makes it particularly vulnerable to staining from spills, splashes and general household grime. Moisture accumulation encourages mould and mildew growth, whilst soap residue creates a film that attracts additional dirt. Traditional cleaning methods often prove inadequate because they fail to penetrate deeply enough or lack the chemical properties needed to break down embedded stains effectively.
Why conventional cleaners fall short
Many commercial grout cleaners contain aggressive chemicals that may damage surfaces or pose health risks through prolonged exposure. Additionally, these products frequently carry substantial price tags without guaranteeing superior results. The method described here offers a cost-effective alternative that performs comparably whilst minimising environmental impact and reducing household chemical exposure.
Having established why traditional approaches often disappoint, examining the specific ingredients that make this method so effective becomes essential.
The three essential ingredients
The cleaning mixture requires only three components, each contributing distinct properties that work synergistically to restore grout:
- Baking soda (½ cup): this mild alkali acts as a gentle abrasive, lifting dirt without scratching surfaces whilst neutralising odours
- Hydrogen peroxide (¼ cup): this oxidising agent breaks down organic stains and possesses natural bleaching properties that brighten discoloured grout
- Dishwashing liquid (1 tablespoon): this surfactant reduces surface tension, allowing the mixture to penetrate grout pores more effectively whilst cutting through grease
The science behind the combination
When combined, these ingredients create a powerful cleaning paste that addresses multiple types of staining simultaneously. The baking soda provides physical scrubbing action, the hydrogen peroxide tackles deep-set organic stains through oxidation, and the dishwashing liquid ensures thorough coverage and penetration. This triple-action approach explains why the mixture outperforms single-ingredient solutions.
Ingredient quality considerations
| Ingredient | Recommended type | Why it matters |
|---|---|---|
| Baking soda | Standard bicarbonate of soda | Consistent particle size ensures even abrasion |
| Hydrogen peroxide | 3% concentration | Sufficient strength without surface damage risk |
| Dishwashing liquid | Concentrated formula | Better degreasing properties with less product |
With the ingredients identified and their roles clarified, the practical aspects of mixing and applying this solution warrant detailed attention.
Preparation and application: key steps
Achieving optimal results requires following a methodical preparation process and applying the mixture correctly. Rushing through these stages diminishes effectiveness and may necessitate repeated applications.
Mixing the solution properly
Begin by combining the baking soda and hydrogen peroxide in a clean bowl, stirring thoroughly until a thick paste forms. The consistency should resemble toothpaste—thick enough to adhere to vertical surfaces yet spreadable. Add the dishwashing liquid last, mixing gently to avoid creating excessive foam that might dilute the cleaning power.
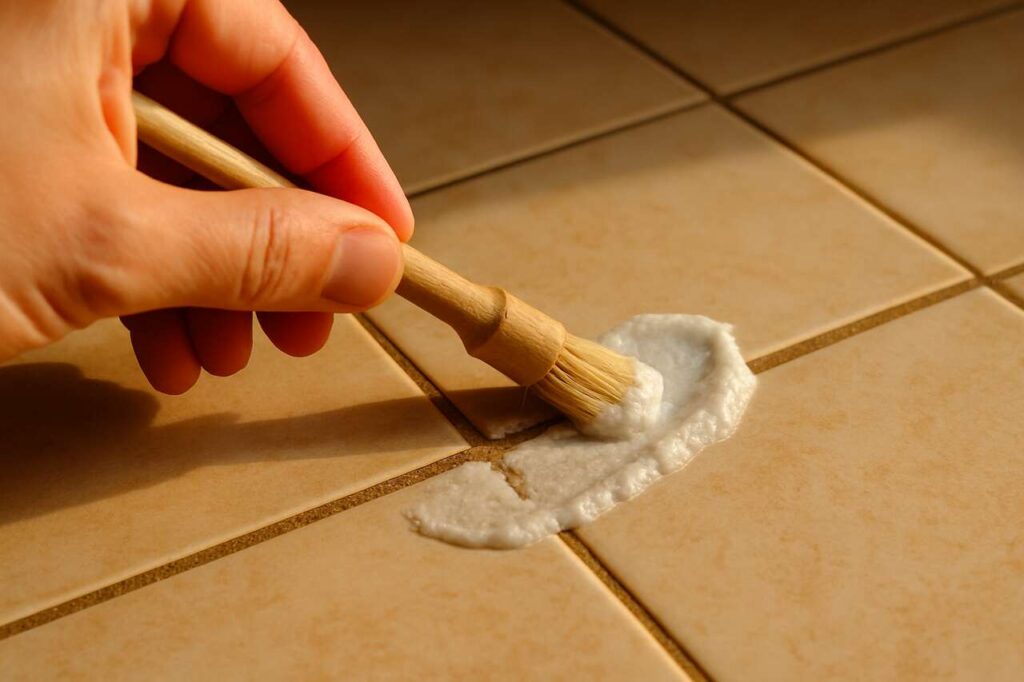
Application technique
Using a small brush, such as an old toothbrush or dedicated grout brush, apply the paste directly onto the grout lines. Work in sections to maintain control and ensure even coverage. Press the mixture into the grout rather than simply spreading it across the surface. This pressing motion forces the cleaning agents into the porous material where stains reside.
Timing and scrubbing
Allow the mixture to sit for 10 to 15 minutes. During this period, the chemical reactions necessary for stain breakdown occur. Avoid letting the paste dry completely, as this reduces effectiveness. After the waiting period, scrub the grout lines using circular motions with moderate pressure. Rinse thoroughly with clean water and wipe away residue with a damp cloth.
Understanding why this natural approach succeeds where commercial products sometimes fail reveals broader advantages beyond mere cleanliness.
The benefits of a natural mix
Choosing this environmentally conscious cleaning method extends advantages far beyond the immediate visual improvement of grout lines. The benefits encompass health, financial and ecological considerations that align with contemporary priorities.
Health and safety advantages
Unlike many commercial cleaners containing volatile organic compounds, this mixture poses minimal health risks. The ingredients produce no toxic fumes requiring ventilation, making the cleaning process safer for households with children, pets or individuals with respiratory sensitivities. The absence of harsh chemicals also eliminates concerns about skin irritation during application.
Economic considerations
- Significantly lower cost compared to branded grout cleaners
- Ingredients serve multiple household purposes, maximising value
- Reduces need for professional cleaning services
- Long shelf life of components prevents waste
Environmental impact
The biodegradable nature of these ingredients means they break down harmlessly after disposal, unlike synthetic chemicals that persist in water systems. This method supports sustainable household practices without compromising cleaning effectiveness, demonstrating that ecological responsibility need not require sacrifice.
The transformation of grout appearance naturally influences perceptions of the entire space it occupies.
Changing the feel of your interior
Clean grout delivers disproportionate aesthetic impact relative to the effort invested. The stark contrast between discoloured and freshly cleaned grout lines fundamentally alters how a room appears and feels to occupants and visitors alike.
Visual transformation effects
Bright, clean grout creates definition between tiles, enhancing the geometric patterns that tiled surfaces create. This renewed clarity makes rooms appear larger, brighter and more meticulously maintained. Bathrooms gain a spa-like quality, whilst kitchens project cleanliness and hygiene—crucial in food preparation areas.
Psychological benefits
Living in a space with visibly clean surfaces contributes to mental wellbeing and reduces stress associated with neglected household maintenance. The satisfaction derived from achieving professional-looking results through personal effort enhances the sense of control over one’s environment.
Sustaining these improvements requires establishing practical maintenance routines that prevent the return of stubborn staining.
Maintaining flawless tiles daily
Preserving the results achieved through deep cleaning demands consistent preventative measures rather than periodic intensive efforts. Simple daily and weekly practices dramatically extend the time between deep cleaning sessions.
Daily maintenance practices
Wiping down tiled surfaces after use, particularly in bathrooms and kitchens, prevents moisture and residue accumulation. Using a squeegee on shower walls removes standing water that encourages mould growth. These brief actions, requiring mere seconds, significantly reduce grout deterioration.
Weekly care routine
- Sweep or vacuum tiled floors to remove abrasive dirt particles
- Mop with a mild cleaning solution appropriate for tile type
- Inspect grout lines for early signs of staining
- Address small problem areas immediately before they worsen
Preventative sealing
Applying a quality grout sealer creates a protective barrier that repels moisture and stains. This treatment, repeated annually or as manufacturer instructions specify, substantially reduces the porosity that makes grout vulnerable to discolouration.
Restoring grout to its original appearance need not involve expensive products or professional services. The three-ingredient method described here demonstrates that effective cleaning solutions often reside in kitchen cupboards rather than specialist retailers. By combining baking soda, hydrogen peroxide and dishwashing liquid, homeowners can achieve remarkable results in just 15 minutes. This approach offers financial savings, health benefits and environmental advantages whilst delivering professional-quality outcomes. Paired with sensible daily maintenance, this method ensures tiled surfaces remain attractive focal points rather than sources of domestic frustration.